
Planting & 'Parenting' Trees (Approved Trees, Planting Instructions, Preventing Surface Roots)
How proper planting and ongoing care help trees grow strong, healthy, and safe in our community.
Trees Are Living
They have requirements that must be met to enable them to keep on living. For this reason care must be taken in choosing a tree species appropriate for the planting spot, planting it correctly, and providing effective follow-up tree care. The need for care is present throughout the life of the tree, although the types of care may change.
Like other living things, trees do not last forever. In a forest, over-mature trees die, fall to the ground, and begin to sustain other trees and vegetation through the rotting process. However, for safety's sake, trees in a city setting should be removed before they reach that point.
Coeur d'Alene's Urban Forestry program has a list of trees recommended for street side planting, information about selecting trees according to purpose and site, and guidelines for correctly planting and caring for trees. In addition, Coeur d'Alene has a licensing process for tree care services which can be hired to work on public trees. Permits are required for planting, pruning or removing public trees (including those within the rights-of-way).
Planting Instructions
- Permit - Obtain a free planting permit from the City.
- Purchase Tree - Purchase your tree from a nursery. Plant materials must meet the minimum acceptable standard set by the American Association of Nurserymen's American Standard for Nursery Stock, ANSI 260.1. Broken, damaged, diseased, or substandard stock are prohibited from being planted in the public rights-of-way and will be rejected.
- Selecting the Site - Choose your planting site. Take into consideration spacing between the future width of the branches and other obstacles, like light poles or other trees. Trees need room to grow. A small tree needs 25 feet of room (10 to 15 feet to either side of it) to grow correctly. A medium tree needs 35 feet, and a large tree needs 45 feet. The width of the trunk and future roots should also be considered as the width of the planting strip limits what size of tree you can put there. A planting strip that is 4 to 5 feet between the sidewalk and curb can only accommodate a tree from the small species list. Medium trees need 5 to 8 feet of width and large trees need 8 feet or greater to grow. Do not plant over gas or water lines. It's always good to call in a utilities locate to 811. Only trees from the small species list can be planted under powerlines.
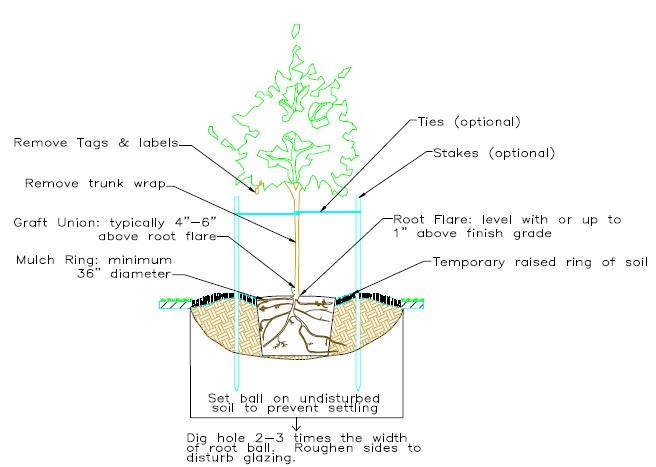
- Prepare the Tree - Remove the tree from the container and remove any bamboo poles, tape, and strings. These are much more difficult to remove after planting, as the trees can be 10 to 12 feet tall. Scarify and chop up the root ball. This can't be stressed enough. The roots from the container have been growing for several years in a circle inside the container and will choke the tree and make it grow in an unstable way. Don't hold back. Loosening the roots can be vigorous as the roots need to be freed to grow once planted. Straighten or cut and remove any circling roots and separated them from each other. Any encircling mass must be cut up. Remove any excess soil from the top of root ball to expose the root flare.
- Dig the Hole - You want the hole to be as wide as the planting container. A good way to do this is to remove the tree from the container and turn the container upside down where you want the tree planted. Mark a line around the container and then begin digging. To determine the depth of the hole, place your tree in the hole and place a flat stick across the top of the hole to see if the stick is level with the root flare. The root flare is the point where the topmost structural root emerges from the trunk (not to be confused with the root grafting line). The depth of the hole should be measured from the root flare to the bottom of the ball.
- Plant the Tree - Place the tree in the hole with the root flare level with or up to 1" above finish grade and begin to backfill with dirt, making sure to tamp the soil down moderately. Too much tamping can make the soil too hard for water to penetrate, and too little won't keep the tree stable while the roots get established. Keep backfilling and tamping until the hole is filled. NOTE* A tree planted with the root flare below grade will be rejected.
- Water the Tree - Construct a temporary 4 to 6 inch raised berm of compost or mulch around the tree. This will help contain water and protect the tree from grass, weeds, and string trimmers. The ring should be around 36 inches in diameter and fill the ring with the same compost or much to a depth of around 2 inches. NOTE: Leave a 2-inch gap between the mulch and the tree trunk to keep the root flare above grade and to prevent the trunk from rotting. Fill a 5-gallon bucket full of water and slowly pour into the ring, making sure to not overflow the raised berm of compost. Fill the bucket again and repeat. Do this once per week during the growing seasons for the first few years until the tree gets established (twice a week when temperatures get really hot). Sprinklers for grass are not enough to water your tree. Grass is greedy and will take all that water. Using only sprinklers to water your tree while it is getting established will make the tree send out surface roots in search of water (you don't want that). Using a bucket or installing a drip line will help the roots go deeper for the water.
- Test the Tree - Give the tree a light shake to see if it feels firm enough to stand on its own. If the soil around the trunk moves when you shake it or it doesn't feel firm, place tree stakes in the ground on either side of the tree and attach the tree to them with tree ties. Don't use rope or wire, as that can girdle and kill the tree when it moves in the wind. Ties must be a wide (minimum 1 ") flexible belt-like strapping. Do not over-tighten around tree. Ties should be tight enough to support the tree while allowing it to sway. Remove stakes and ties within one year.
- Clean Up - Double check the tree for tape or wires and rope and remove them. Please keep the species label on the tree until the City does its post planting inspection so we can ensure proper planting and put the new tree in our tree inventory. The label will need to be removed after that if the inspector misses it. Prune only broken or damaged branches. NOTE: Although you may be tempted, do not apply fertilizer at time of planting. This can actually harm the tree.
- Inspection - Schedule a post planting inspection with the City's Urban Forester.
- ENJOY YOUR NEW TREE!
Contact Us
Hours
Mon — Fri 8am — 5pm